
Let’s be honest. Valentine’s Day is around the corner, and while you might love the festive spirit, you’re not necessarily into giant, glittery red hearts on every single nail. Maybe you’re a professional who needs a workplace-appropriate look, a minimalist at heart, or someone who just wants a whisper of the holiday—not a shout. If the thought of complicated nail art with a dozen tools makes you want to hide your hands, you’re in the right place.
This guide is for anyone who believes less is more. Valentine’s Day nail art (minimal hearts) is all about subtlety, elegance, and a touch of personal expression. It’s quick, mistake-forgiving, and incredibly stylish. Whether you’re a total beginner or a seasoned polish pro, these ideas will give you that perfect, Instagram-worthy look without the stress or the mess.
Why Minimalist Nail Art is a Win for Everyone
Before we dive into the designs, let’s talk about why a minimalist approach is so brilliant. First, it’s timeless. A tiny, well-placed heart won’t look dated on February 15th. Second, it’s versatile. These designs work just as well for a Galentine’s brunch as they do for a romantic dinner or a normal Tuesday at the office. Finally, it’s accessible. You don’t need a steady hand or a professional kit. A toothpick or a bobby pin can be your main tool!
What You’ll Need: A Super Simple Toolkit
You can create stunning looks with just a few basics:
- Base Coat & Top Coat: Non-negotiable for a long-lasting manicure.
- Your Main Color: Think neutrals (nude, taupe, soft pink, white, black), muted tones (sage, lavender), or classic sheer shades.
- An Accent Color: For the hearts! A classic red, wine, or even a metallic like gold or silver.
- Tools: A thin nail art brush, a dotting tool (or a bobby pin/toothpick), and some nail polish remover and a small brush for clean-up.
Step-by-Step: 3 Easy Minimal Heart Designs to Try
Here are three fail-safe designs that capture the essence of Valentine’s Day nail art (minimal hearts). Follow along!
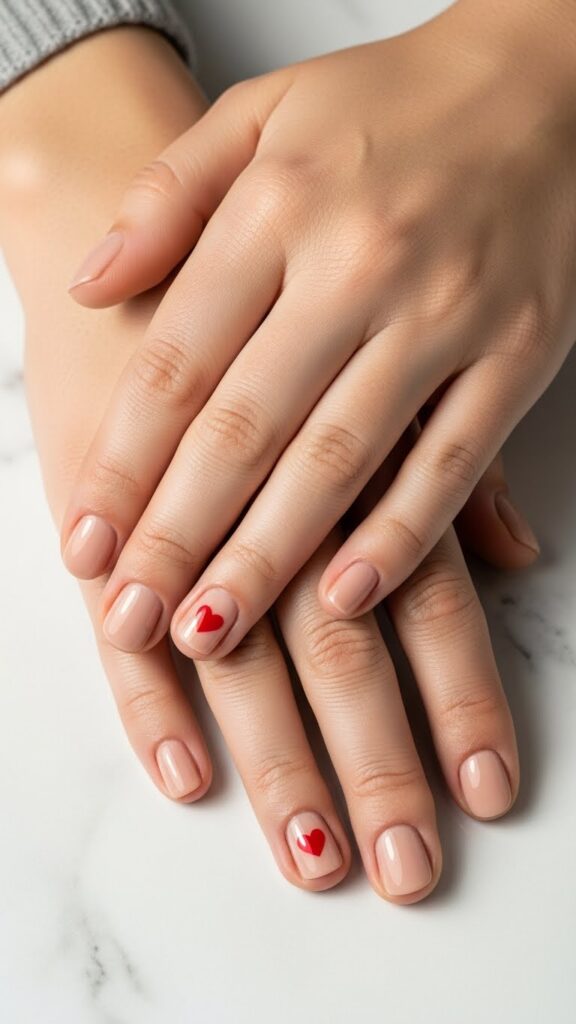
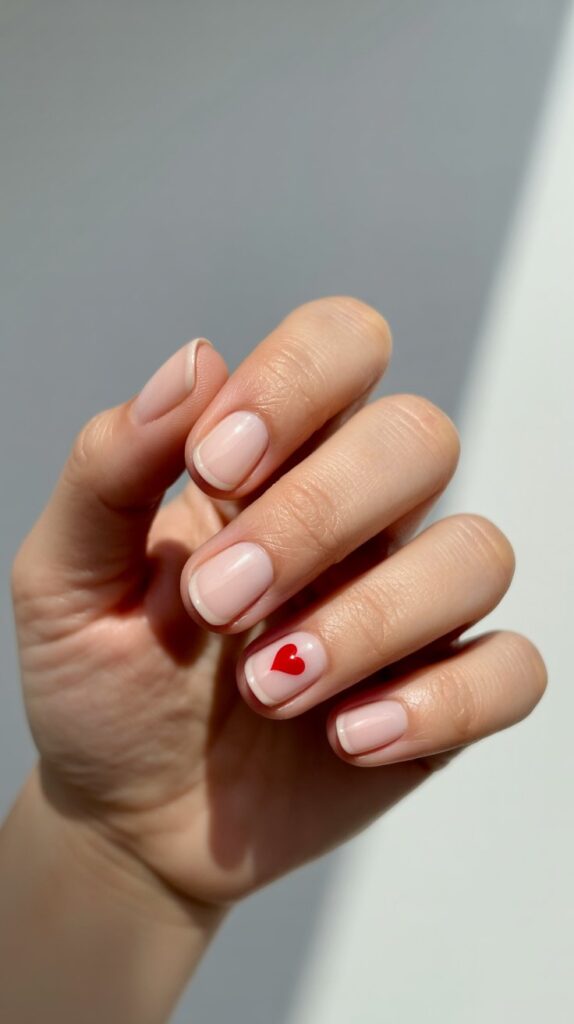
Design 1: The Single, Delicate Heart (Perfect for Beginners)
This is the ultimate starting point. One heart, one nail.
- Prep & Paint: Apply your base coat and two thin coats of your main color. Let it dry completely.
- Create the Heart: Using your accent color and a dotting tool (or toothpick), place two small dots right next to each other on your chosen nail (ring fingers are classic!).
- Shape It: With the same tool, gently drag a tiny bit of polish from the space between the dots downward to form the point of the heart. It might take a practice swipe on paper first!
- Seal It: Once dry, lock it in with a top coat.
New to nail art? I’ve curated a list of the most beginner-friendly, quick-drying polishes that make designs like this a breeze. [Check out my top picks here] (affiliate link).
Design 2: The Negative Space French Tip
A modern twist on two classics.
- Prep: Apply your base coat and a sheer nude or pink polish. Or, for true negative space, just use a base coat.
- Outline the Tip: Using a striping brush or the polish brush carefully, paint a thin “smile line” at the tip of your nail with your accent color. It doesn’t have to be perfect!
- Add the Heart: While the tip is still slightly wet, use your dotting tool to add a single small heart right at the junction of the tip and the bare nail. The wet polish will help it blend slightly for a softer look.
- Finish: Apply your top coat.
Design 3: The Tiny Heart Confetti
Whimsical and scattered—no two nails need to be alike.
- Paint the Base: Go for a clean, solid base color. White, pale grey, or a soft blush are stunning here.
- Dot Confetti: Using 2-3 different accent colors (think crimson, dusty rose, and gold), use your dotting tool to create random tiny dots on each nail.
- Transform Dots to Hearts: Before the dots dry, take a pin or a fine brush and gently drag the top of each dot inward to create a tiny “V” shape, turning it into a micro heart.
- Protect the Art: A generous layer of glossy top coat is essential here.
Pro Tips for a Flawless Minimalist Manicure
- Clean-Up is Key: Dip a small, angled brush in nail polish remover to clean up edges around your cuticles for a professional finish.
- Patience is a Virtue: Let each layer dry thoroughly before moving to the next. Smudging is the enemy of minimalism!
- Play with Placement: The beauty of minimalism is asymmetry. Try a heart just at the base of the nail (the “lunula” or moon) or off to one side.
- Matte vs. Glossy: Try a matte top coat over a classic red heart on a nude base. It’s incredibly chic and modern.
🔥 Recommended Valentine’s Day Nail Art Essentials
Here are a few of my favorite Valentine’s Day nail art essentials that make creating cute, romantic (and Pinterest-worthy!) nail designs easier, faster, and way more fun — even if you’re a total beginner. 💅❤️
1. Valentine’s Day Nail Art Stickers (Hearts, Love & Minimal Designs)
An easy, no-skill way to get perfect heart designs every time. These self-adhesive stickers are great for minimalist nails, accent fingers, or quick Valentine manicures.
👉 Check it out on Amazon
2. Valentine’s Nail Art Stickers – Roses, Bows & Romantic Icons
A fun mix of romantic elements like roses, hearts, and love symbols. Ideal for readers who want cute Valentine nails without freehand painting.
👉 See today’s price on Amazon
3. Beetles Valentine Gel Nail Polish Set (Reds, Pinks & Neutrals)
A versatile gel polish set featuring classic Valentine shades. Perfect for minimalist heart designs, French tips, or soft romantic looks.
👉 Grab it on Amazon
4. Nail Art Brushes & Dotting Tool Set
This tool kit makes tiny hearts, dots, and fine lines much easier — even for beginners. A must-have for DIY Valentine nail art tutorials.
👉 View it on Amazon
5. Valentine’s Nail Art Accessories Bundle (Stickers + Decorations)
A complete mix-and-match kit with heart decals, glitter accents, and romantic nail decorations. Great for creative readers who love experimenting.
👉 Get it on Amazon
Disclosure:
As an Amazon Associate, I earn from qualifying purchases. This means if you click on one of the product links and make a purchase, I may receive a small commission at no extra cost to you. I only recommend products that are popular, well-reviewed, and genuinely useful for creating beautiful Valentine’s Day nail art.
FAQ: Your Minimal Heart Nail Art Questions, Answered
Q: I’m really uncoordinated. Can I still do this?
A: Absolutely! Use nail vinyls or stickers in heart shapes. Paint your base color, let it dry, apply the sticker, paint over it with your accent color, peel off the sticker, and top coat. Perfect shapes every time.
Q: How can I make my minimalist manicure last longer?
A: The holy trinity: cap your free edges (paint the very tip of your nail), use quality base and top coats, and reapply a fresh layer of top coat every 2-3 days.
Q: Are there gel versions for these designs?
A: 100%. These designs translate beautifully to gel polish, which offers more working time. Just remember to use a wipe-on cleanser for any mistakes before curing.

Conclusion: Embrace the Subtle Side of Valentine’s Day
Valentine’s Day nail art (minimal hearts) proves that you don’t need to be loud to be expressive. It’s an approachable, elegant, and deeply personal way to celebrate the season of love—whether that love is for a partner, your friends, or simply for treating yourself to a beautiful, simple manicure. By focusing on clean lines, thoughtful placement, and soft colors, you create a look that’s both festive and fiercely sophisticated.
Ready to take your at-home manicures to the next level? I’ve put together a complete resource hub with video tutorials for these designs, deep-dive reviews on the best tools, and guides for transitioning to gel polish safely. Explore all my nail art guides and trusted product recommendations to build your perfect minimalist kit. Your most chic Valentine’s Day look is just a click away.

