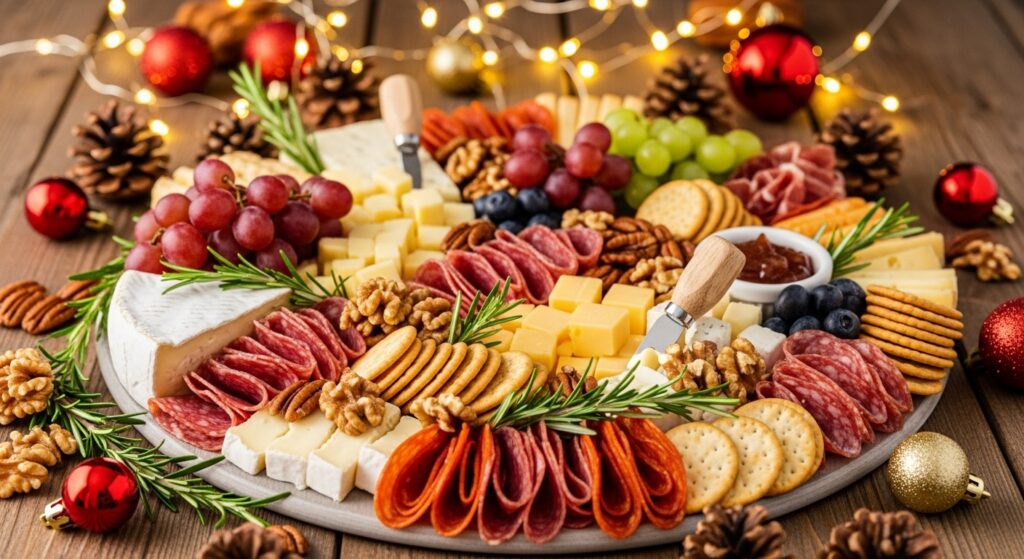
So you’ve seen those impossibly perfect charcuterie boards on Instagram—the ones that look like they were styled by a Renaissance painter with a single, tear-shaped cheese curl placed just so. And you’ve thought, “I could never.” Well, I’m here to call BS. Building a show-stopping Christmas board isn’t about fancy skills; it’s about a little strategy and the glorious art of piling things attractively. Consider this your permission slip to create a delicious, beautiful mess that people will actually want to eat.
Why This Recipe is Awesome
Let’s count the ways this guide will make you a holiday hero.
- Zero Cooking Required: Your oven gets to take a well-deserved nap. This is all about assembly, AKA the fun part where you get to snack on the ingredients.
- It’s Forgiving as Heck: Unlike a temperamental soufflé, there are no real rules. Dropped a cracker? Call it “deconstructed.” Cheese broke awkwardly? It’s “rustic.” You literally cannot lose.
- The Ultimate Crowd-Pleaser: Picky aunt, gluten-free cousin, hungry uncle? A good board has something for everyone. It’s the edible version of a non-committal nod, and it works every time.
Ingredients You’ll Need
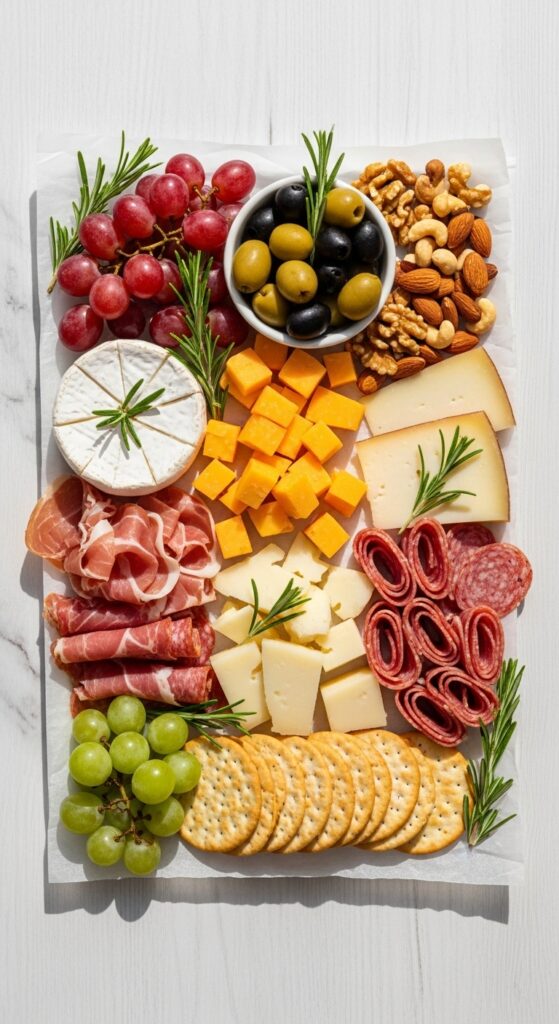
Think of this as a formula, not a strict shopping list. Aim for 1-2 items from each category for a balanced board.
The Star Players (Meats & Cheeses):
- 2-3 Types of Cheese: Get a mix: one hard (like aged Cheddar or Manchego), one soft (like Brie or Camembert), and one funky/wild card (like Gorgonzola or a pepper Havarti).
- 2-3 Types of Cured Meats: Something classic (like Prosciutto), something spicy (like soppressata), and something you can roll up (like salami).
The Supporting Cast (Crackers & Bread):
- 2-3 Varieties of Crackers & Bread: Include a plain water cracker, a seeded or multigrain option, and some breadsticks or a sliced baguette for texture.
The Glitter (Fruits & Sweets):
- Fresh Fruit: Grapes (on the vine looks fab), berries, or sliced figs.
- Dried Fruit: Apricots, mission figs, or cranberries for a chewy, sweet hit.
- Something Sweet: A small dish of honey or jam, and some high-quality dark chocolate pieces.
The Crunch (Nuts & Extras):
- Nuts: Marcona almonds or candied pecans. They feel fancy with minimal effort.
- Olives & Pickles: A small bowl of cornichons or your favorite olives cuts through the richness.
Step-by-Step Instructions
- Bowls and Anchors First. Place any small bowls or ramekins on your board first. These are for messy items like olives, jam, or honey. They act as anchors for your design.
- Place the Cheese. Take your cheeses out of the fridge about 30-60 minutes before serving. Arrange them around the board, spacing them out. Pro-tip: Pre-slice a few pieces of a harder cheese to break the ice and show people it’s okay to dig in.
- Fold and Flounce the Meat. Get creative with your meats. Fold prosciutto into ribbons, roll salami into loose cones, and fan out slices. Group each type of meat together near a cheese for easy pairing.
- Fill in the Gaps. This is where the magic happens. Use your crackers and bread to create “paths” between the cheeses and meats. Then, start filling the empty spaces with piles of grapes, clusters of nuts, and handfuls of dried fruit.
- The Final Flourish. Add your fresh herbs (rosemary sprigs are a Christmas classic) and your sweet elements like dark chocolate. Drizzle honey over a soft cheese for that ultimate “wow” factor. Step back and admire your work.
Common Mistakes to Avoid
Learn from my past charcuterie crimes so you don’t have to commit them.
- The Soggy Cracker Catastrophe: Never place crackers directly next to a wet ingredient. Keep crackers and bread in their own dry zones or serve them on the side in a basket.
- The “Where Do I Start?” Paradox: If no one takes the first bite, the board becomes a museum piece. Pre-slice a cheese or two to give guests a clear starting point.
- Overcrowding. A packed board is a stressful board. Give the ingredients some breathing room. It looks more abundant and is easier to navigate.
- Serving everything ice-cold. Cold cheese has all the flavor of a cardboard box. Take your cheese out ahead of time! Let it come to room temperature to unleash its full, delicious potential.
Alternatives & Substitutions
This is your board, your rules.
- Vegetarian? Ditch the meats and add more plant-based goodness: marinated artichoke hearts, roasted peppers, different kinds of nuts, and extra cheeses.
- On a Budget? You don’t need a dozen expensive items. Buy one really nice cheese and one nice meat, then bulk it out with affordable crackers, in-season fruits, and nuts from the bulk bin.
- No Board? No Problem. A large cutting board, a baking sheet, or even a big platter works perfectly. IMO, the ingredients matter more than the vessel.
- Feeling Fancy? Add a small pot of whole-grain mustard, some quince paste (it’s amazing with Manchego), or a few fresh figs sliced into pretty stars.
FAQ (Frequently Asked Questions)
How far in advance can I assemble this?
You can place your bowls, cheeses, and meats about 2-3 hours ahead. Wait until the last 30 minutes to add crackers and fresh fruit to prevent sogginess. Cover the whole thing loosely with plastic wrap and keep it in a cool spot.
What’s the best board to use?
Wood or slate is classic, but use what you have! The size is more important. A board that’s too small is a nightmare. A board that’s a little too big is an opportunity for more snacks. I see no problem here.
Help! I’m allergic to nuts!
Easy—just skip ’em! Add more seeds (pumpkin seeds are great), extra fruit, or even some crunchy chickpeas to fill the void.
How much should I make per person?
As a rough guide, plan for about 3-4 ounces of cheese and 3 ounces of meat per person if the board is the main event. If it’s an appetizer, you can get away with less.
Can I make a kid-friendly board?
Absolutely! Swap the fancy cheeses for mild cheddar cubes and mozzarella pearls, the meats for pepperoni sticks, and add fun items like pretzels, popcorn, and mini cookies. They’ll love it.
🎁 Recommended Holiday Kitchen Essentials
🍳 Here Are a Few of My Favorite Holiday Kitchen Essentials — Tools That Make Christmas Cooking Easier, Faster, and Way More Fun (From Baking Cookies to Preparing Cozy Casseroles and Festive Drinks!)
- Crock-Pot 8-Quart Programmable Slow Cooker
Perfect for big families or meal prepping — set it, forget it, and come home to tender, juicy meals every time.
👉 Check it out on Amazon - Christmas Cookie Cutter Set
Bake adorable festive cookies that everyone will love.
👉 Get yours now on Amazon - Stand Mixer (5–6 Quart)
Makes mixing doughs and batters effortless during holiday baking.
👉 Grab it here on Amazon - Glass Punch Bowl Set
Serve Christmas drinks and punches beautifully.
👉 Shop now on Amazon - Ceramic Baking Dish Set
Ideal for creamy casseroles and sweet desserts — oven to table in style.
👉 View it on Amazon
Disclosure: As an Amazon Associate, I may earn a small commission from qualifying purchases at no extra cost to you. I only recommend products I personally love and use for my own recipes.

Final Thoughts
And there you have it. You are now armed with the knowledge to walk into any holiday party, lock eyes with a blank board, and conquer it with confidence. Remember, a great charcuterie board isn’t about perfection; it’s about abundance, variety, and the joy of sharing good food.
Now go forth, create your edible masterpiece, and accept all the compliments headed your way. You’ve totally earned that first, perfectly curated bite.