Okay, let’s be real. You saw “Red Velvet” and your brain did the thing—it flashed to images of cocoa and cream cheese frosting. But then you saw “Vanilla” and did a full mental record scratch. A vanilla red velvet cake? Is that even allowed? Stick with me here. This is the brilliant, less-fussy cousin of the classic. All the dramatic scarlet beauty and tangy-sweet flavor, but with the warm, cozy soul of a vanilla cake. It’s a two-mug rebellion, and you’re invited to lead it.
Why This Recipe is Awesome
For starters, you are about five minutes from warm cake. The microwave is your best friend here, not your enemy. This recipe is also a conversation starter (“Wait, vanilla? Tell me more!”). But the best part? It’s infinitely forgiving and adaptable. No cocoa powder? No problem—this recipe was born that way. It’s perfect for when you want that iconic red velvet experience but your pantry is giving you side-eye. It’s awesome because it works, every single time.
Ingredients You’ll Need
Grab a mug and let’s raid the cupboard. This list is beautifully simple.
- 5 tablespoons all-purpose flour: The main structural support. Don’t pack it in the tablespoon; just scoop and level.
- 3 tablespoons granulated sugar: Sweetness, thy name is sugar.
- ¼ teaspoon baking powder: The magic that makes it puff up like a proud little cloud.
- A tiny pinch of salt: The flavor enhancer. Seriously, it’s a must.
- 3 tablespoons milk: Whole, 2%, almond, oat—your choice. The cake hydrator.
- 2 tablespoons melted butter or neutral oil: Butter for rich flavor, oil for ultimate moistness. I’m Team Butter, but you do you.
- ½ tablespoon white vinegar: The secret weapon. This is what gives you that authentic red velvet “tang” and reacts with the baking powder for a tender crumb.
- 1 teaspoon vanilla extract (or more, I’m not judging): The star of the show! Use the good stuff if you have it.
- 1 ½ tablespoons red food coloring: Gel coloring is king for a vibrant, bold red without thinning the batter. Liquid works in a pinch, but you’ll need a bit more.
For the “No-Fuss, Must-Have” Glaze:
- 2 tablespoons cream cheese, softened: Not cold from the fridge. Give it a 10-minute counter rest.
- 1 ½ tablespoons powdered sugar: Sift it if you hate lumps. Whack it with a fork if you’re feeling feisty.
- A drizzle of milk or cream: To make it drizzle-able.
Step-by-Step Instructions
- Pick Your Mug Wisely. Choose a large, microwave-safe mug (think 12 oz or bigger). This baby rises. Lightly grease it with butter or a spritz of oil. This is your only dish. Cherish the easy cleanup.
- Mix the Dry Squad. In your mug, whisk the flour, sugar, baking powder, and salt with a fork. Get it all nice and even. No one wants a pocket of pure baking powder. Shudder.
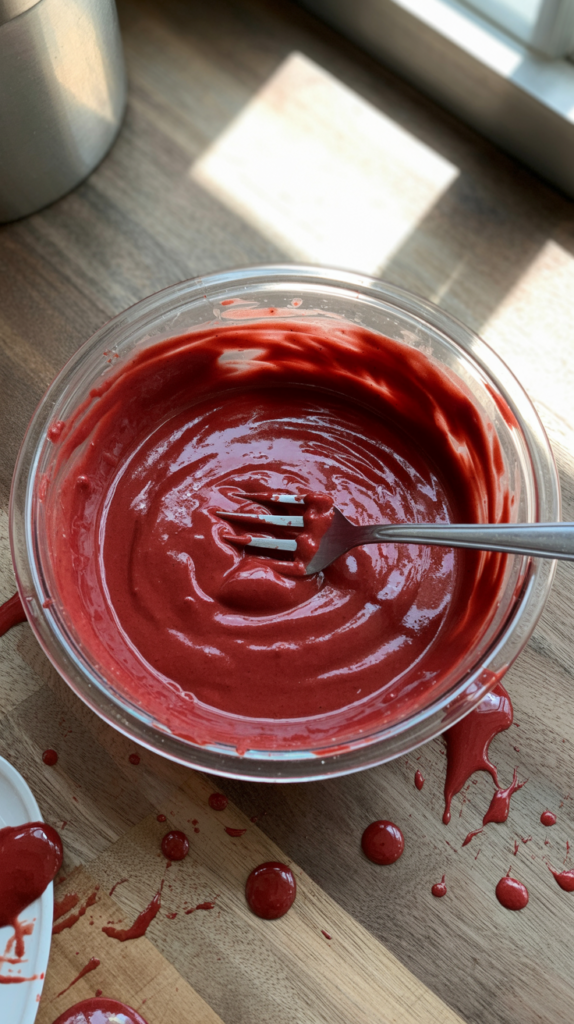
- Create the Wet Dream Team. In a small separate bowl (or just make a well in your dry ingredients), mix the milk, melted butter/oil, vinegar, vanilla, and red food coloring. Stir this vibrant red elixir until it’s one cohesive liquid. Pro-tip: Mix your wet ingredients separately first to ensure the color is fully blended and gorgeous.
- Combine & Conquer. Pour your stunning red wet mixture into the mug with the dry ingredients. Stir with your fork until just combined. A few small lumps are FINE. Overmixing is the enemy of tenderness. Swipe any batter off the top inch of the mug’s insides to prevent crispy stragglers.
- Microwave to Perfection. Place your mug in the microwave. Nuke it for 70-90 seconds. Start checking at 70. The top should look set, and it might be just barely pulling away from the sides. It will look slightly moist—that’s good! It keeps cooking as it rests. Let it sit in the microwave for 60 seconds after cooking.
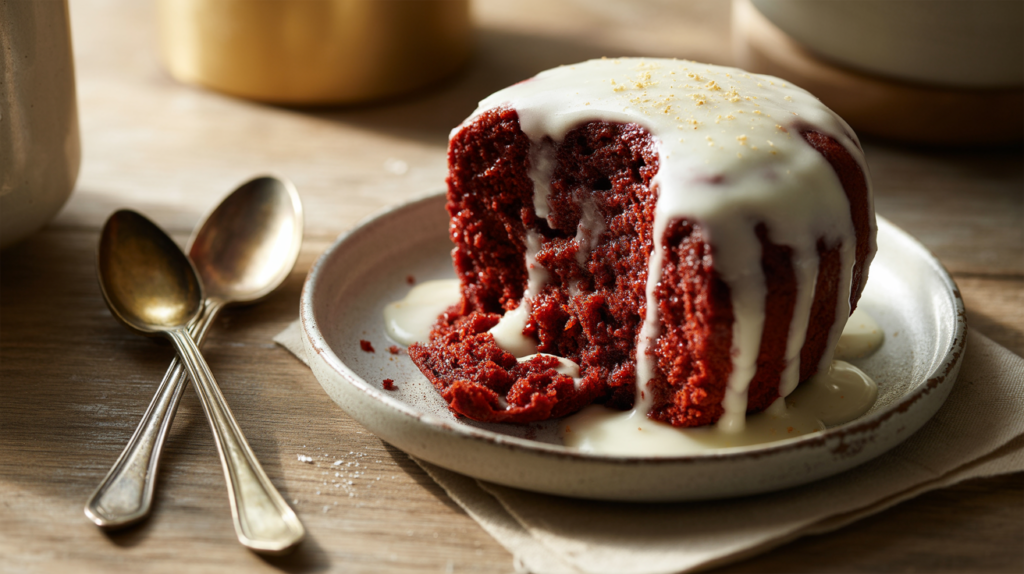
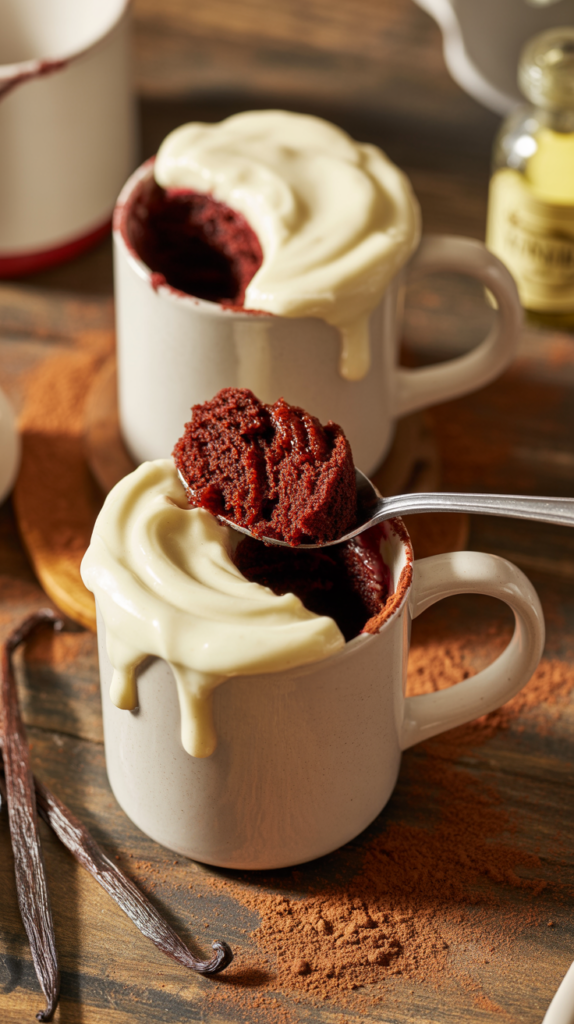
- Glaze & Devour. While it’s resting, mash together the cream cheese, powdered sugar, and milk for your glaze. Dump the warm cake onto a plate (or eat mug-style), drizzle that glorious white glaze all over the red, and eat it immediately. This is peak living.
🎁 Recommended Holiday Kitchen Essentials
🍳 Here Are a Few of My Favorite Holiday Kitchen Essentials — Tools That Make Holiday Cooking Easier, Faster, and Way More Fun (From Baking Cookies to Preparing Cozy Casseroles and Festive Drinks!)
- Crock-Pot 8-Quart Programmable Slow Cooker
Perfect for big families or meal prepping — set it, forget it, and come home to tender, juicy meals every time.
👉 Check it out on Amazon - Christmas Cookie Cutter Set
Bake adorable festive cookies that everyone will love.
👉 Get yours now on Amazon - Stand Mixer (5–6 Quart)
Makes mixing doughs and batters effortless during holiday baking.
👉 Grab it here on Amazon - Glass Punch Bowl Set
Serve Christmas drinks and punches beautifully.
👉 Shop now on Amazon - Ceramic Baking Dish Set
Ideal for creamy casseroles and sweet desserts — oven to table in style.
👉 View it on Amazon
Disclosure: As an Amazon Associate, I may earn a small commission from qualifying purchases at no extra cost to you. I only recommend products I personally love and use for my own recipes.
Common Mistakes to Avoid
- Using a Salad Mug: That cute little 8-ounce mug? It’s a flood risk. Use a big one. Trust me on this.
- Cold Cream Cheese Clumps: Trying to mix fridge-cold cream cheese is a workout in frustration. Soften it first for a silky-smooth glaze.
- Skipping the Vinegar: “It smells weird, I’ll skip it.” NO. This is what gives it that signature red velvet personality. It’s non-negotiable.
- Over-microwaving: This is mug cake murder. You’ll get a dry, tough hockey puck. When in doubt, pull it out early. It’s better slightly fudgy than bone-dry.
Alternatives & Substitutions
Play with your food! IMO, it’s encouraged.
- Vinegar Swap: No white vinegar? Apple cider vinegar works beautifully and adds a faint fruity note.
- Dairy-Free Delight: Use plant-based milk and a vegan butter/oil swap. The cake won’t mind. For the glaze, vegan cream cheese is your friend.
- Butter vs. Oil: Butter gives a richer, more cake-like flavor. Oil gives a more consistently moist, tender crumb. Can’t decide? Use 1 tbsp of each!
- Want Chocolate? Add 1 tablespoon of cocoa powder to the dry ingredients and reduce the flour by 1 tablespoon. Boom. Back to classic.
FAQ (Frequently Asked Questions)
- Vanilla Red Velvet? Isn’t that just… red cake? Nope! The tang from the vinegar and the cream cheese frosting keep it firmly in the red velvet family. It’s a lighter, more vanilla-forward twist. Try it before you judge it!
- Can I bake this in the oven? You could, but then it’s just a small cake, and you lose the 5-minute magic. If you must, try 350°F in a ramekin for 15-18 mins.
- My color isn’t vibrant enough! Gel food coloring is 100% the way to go for a true, bold red without affecting the batter texture.
- Can I make this for one? The recipe is written for two modest portions (or one very happy person). It bakes perfectly as-is in one mug. No scaling down needed.
- What if I don’t have cream cheese? A simple vanilla glaze (powdered sugar + milk + vanilla) works, but you’ll miss the tang. Or, just sprinkle with powdered sugar and call it artisanal.
- Can I add mix-ins? A handful of white chocolate chips folded in at the end is a stellar move. Do it.
Final Thoughts
So there you have it. The red velvet mug cake that colorfully defies expectations. It’s fast, unfussy, and deliciously unique. Whether you’re a vanilla devotee or just out of cocoa powder, this little mug of joy has your back. Now go, make a mess (a small one), take a pic of that gorgeous red-and-white swirl, and enjoy the spoils of your 5-minute kitchen adventure. You’ve officially upgraded your lazy dessert game.