Chocolate Peppermint Bundt Cake Recipe: The Festive Showstopper You Need
Picture your holiday dessert table. You want something that makes people stop and stare—a dessert that looks like it came from a fancy bakery but didn’t require a pastry degree to make. You dream of rich chocolate, cool peppermint, and a stunning shape. But maybe your past attempts at Bundt cakes ended in sticking, crumbling, or dry disappointment.
What if you had a chocolate peppermint Bundt cake recipe so reliable it felt like a secret weapon?
This is that recipe. It’s designed for celebration and simplicity, delivering deep chocolate flavor, a hint of festive peppermint, and a moist, tender crumb that will have everyone asking for seconds. I’ll walk you through every step, from the crucial pan prep to the final glossy drizzle, ensuring your cake is not just delicious, but absolutely breathtaking. Let’s bake a holiday memory.
Why This Recipe is Your Holiday Baking Win
This isn’t just any cake. It’s a strategic choice for your festive season.
- Maximum Impact, Minimal Fuss: The Bundt pan creates an elegant design automatically. No layers to frost, no decorations to fuss over.
- Make-Ahead Perfection: This cake tastes even better the next day, making it the ultimate stress-free dessert for parties.
- Crowd-Pleasing Proportions: One cake generously serves 12-16 people, making it perfect for family gatherings and holiday potlucks.
- The Perfect Flavor Harmony: The rich chocolate and cool, bright peppermint is a classic holiday pairing that feels both nostalgic and special.
Your Recipe Roadmap: Ingredients & Tools
Gathering everything first is the key to a smooth baking experience. Here’s your checklist.
For the Cake:
- 2 cups (250g) all-purpose flour
- ¾ cup (75g) unsweetened cocoa powder (Dutch-process preferred)
- 2 cups (400g) granulated sugar
- 1 ½ teaspoons baking soda
- 1 ½ teaspoons baking powder
- 1 teaspoon salt
- 2 large eggs, at room temperature
- 1 cup (240ml) whole milk, at room temperature
- ½ cup (120ml) vegetable oil or melted coconut oil
- 2 teaspoons pure vanilla extract
- 1 cup (240ml) hot strong brewed coffee or hot water
- 1 ½ teaspoons pure peppermint extract
For the Glaze & Decoration:
- 1 ½ cups (180g) powdered sugar, sifted
- 2-3 tablespoons milk or heavy cream
- ¼ teaspoon pure peppermint extract
- ½ cup crushed candy canes or peppermint candies
Essential Equipment:
- A 10-12 cup Bundt pan (A high-quality non-stick pan is your best investment here).
- A stand mixer or hand mixer.
- A fine-mesh sieve for sifting.
- A wire cooling rack.
(Using a kitchen scale for dry ingredients is the #1 trick for consistent, perfect results. It’s more accurate than cup measurements.)
The Step-by-Step Recipe: Your Path to Perfection
Follow these stages in order. I’ve included the why behind key steps, so you bake with confidence.
How to Make This Chocolate Peppermint Bundt Cake Recipe
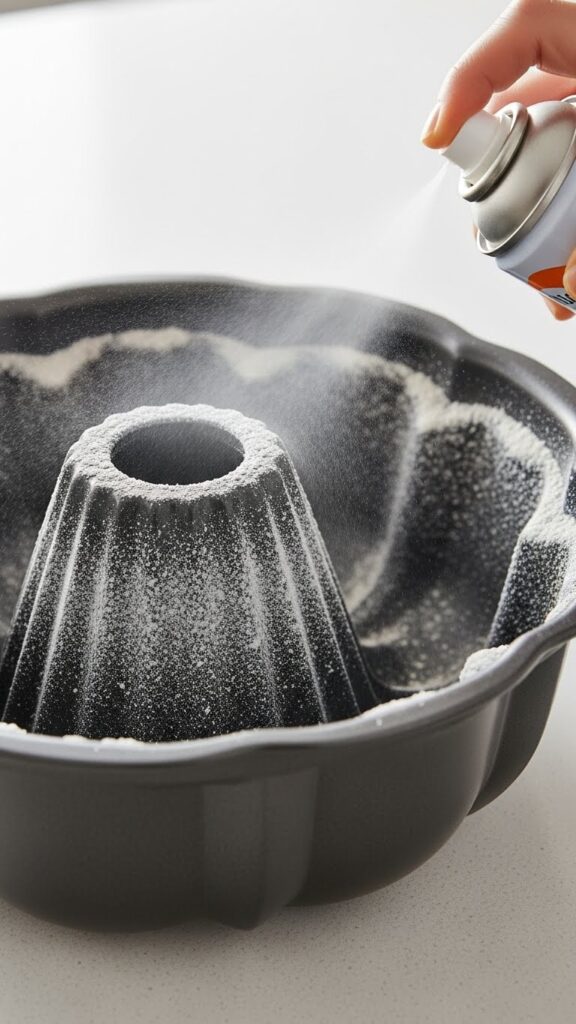
Step 1: Prep Your Pan (The Non-Negotiable First Step).
This is the most important step for a clean release. Do not use just butter or plain spray. Thoroughly coat every nook of your cold Bundt pan with baking spray with flour (like Baker’s Joy). Get into every crevice. Place the greased pan in the freezer while you make the batter.
Step 2: Sift & Combine Dry Ingredients.
In a large bowl, sift together the flour and cocoa powder. This prevents lumps and aerates the mixture for a lighter cake. Whisk in the sugar, baking soda, baking powder, and salt.
Step 3: Mix Wet Ingredients.
In the bowl of your stand mixer fitted with the paddle attachment, combine the eggs, milk, oil, and vanilla extract. Mix on medium speed for about 1 minute until smooth and slightly frothy.
Step 4: Combine Wet & Dry.
With the mixer on low speed, gradually add the dry ingredients to the wet ingredients. Mix until just combined—a few streaks of flour are okay. The batter will be very thick.
Step 5: Add Hot Liquid & Create Peppermint Swirl.
With the mixer still on low, carefully and slowly pour in the hot coffee. The batter will become thin and liquidy—this is correct and will result in a super-moist cake.
Now, pour about one-third of the total batter into a separate bowl. Stir the 1 ½ teaspoons of peppermint extract into this portion.
Step 6: Layer & Swirl.
Retrieve your pan from the freezer. Pour half of the plain chocolate batter into the bottom. Spoon dollops of the peppermint batter over it. Top with the remaining chocolate batter. Take a thin knife or skewer and make 4-5 large figure-eight motions through the batter to swirl. Do not overmix.
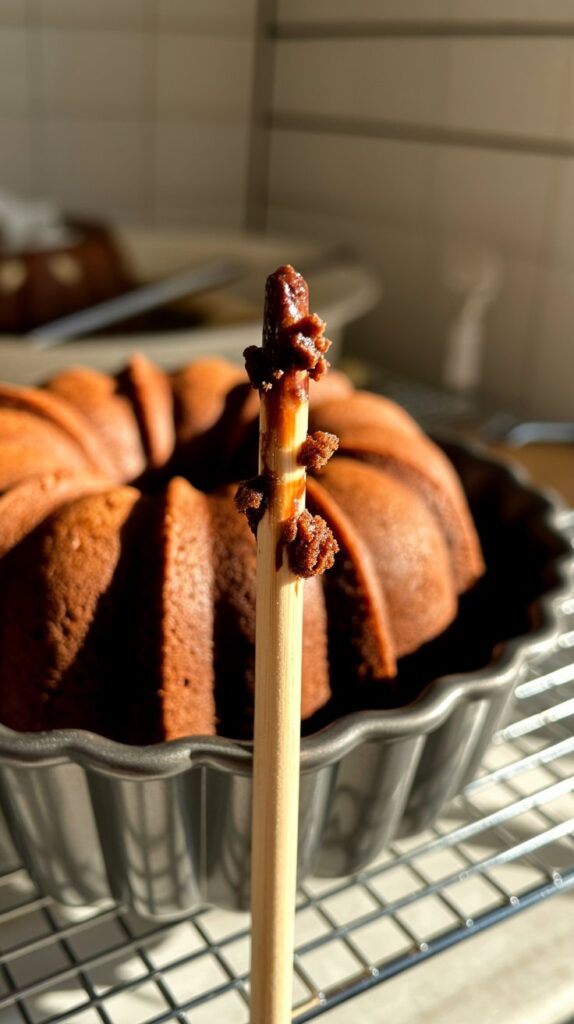
Step 7: Bake & Test for Doneness.
Place the pan in the center of a preheated 350°F (175°C) oven. Bake for 45-55 minutes. The cake is done when:
- The edges pull away from the pan.
- The top springs back when lightly touched.
- A toothpick inserted near the center comes out with a few moist crumbs clinging to it. A clean toothpick means overbaked.
Step 8: The Critical Cool.
Let the cake cool in the pan on a wire rack for exactly 30 minutes. This allows it to set. Then, place the rack over the pan and flip it over in one confident motion. The cake should release. Let it cool completely on the rack before glazing.
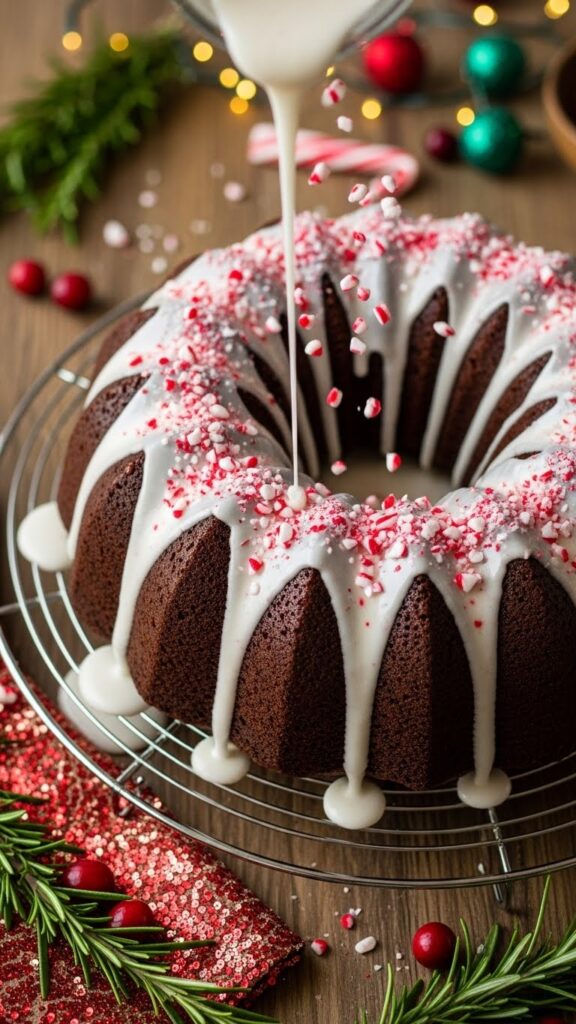
Step 9: Make the Glaze & Decorate.
In a medium bowl, whisk the sifted powdered sugar, 2 tablespoons of milk, and ¼ tsp peppermint extract. Add more milk, ½ teaspoon at a time, until it reaches a thick but pourable consistency (like heavy cream). Drizzle generously over the completely cooled cake. Immediately sprinkle with crushed candy canes.
Pro-Tip for Intense Flavor: The hot coffee is not optional! It “blooms” the cocoa powder, magnifying the chocolate flavor without making the cake taste like coffee. Trust the process.
5 Festive Variations to Try
Mastered the classic? Make it new again:
- White Chocolate Peppermint: Drizzle with a white chocolate ganache (½ cup white chocolate chips + 3 tbsp heavy cream, melted) before the powdered sugar glaze.
- Peppermint Chip: Fold 1 cup of Andes peppermint baking chips or dark chocolate chips into the batter before swirling.
- Mocha Peppermint: Add 1 tablespoon of instant espresso powder to the dry ingredients.
- Candy Cane Surprise: Press whole small candy canes into the bottom of the greased pan before adding batter. They’ll bake into the top (which becomes the bottom) for a fun reveal.
- Gluten-Free Version: Use a 1:1 gluten-free all-purpose flour blend (like Bob’s Red Mill) and ensure all other ingredients are GF.
🔥 Recommended Baking & Kitchen Essentials
Here are a few of my favorite tools that make baking (and biscuit-making!) easier, faster, and way more fun.
1. BLACK+DECKER Crisp ’N Bake Air Fry Toaster Oven
Crisps, toasts, bakes, and air fries — all in one compact countertop oven. Perfect for quick biscuits, snacks, and weeknight cooking.
👉Check it out on Amazon2. CHEFMAN Digital Air Fryer + Rotisserie (XL 10L)
A true all-in-one appliance — air fry, roast, bake, dehydrate, and rotisserie family-size meals with ease.
👉See today’s price on Amazon3. 5-Piece Pastry & Biscuit Cutter Set
Everything you need for perfect biscuits: stainless-steel cutters, dough scraper, pastry blender, and a baking mat — beginner friendly and super durable.
👉Grab it on Amazon4. Nordic Ware Naturals Aluminum Half Sheet Pans (2-Pack)
Professional-quality sheet pans that brown beautifully, never warp, and last a lifetime — essential for any baking lover.
👉View it on Amazon5. Amazon Basics Nonstick 12-Cup Muffin Pans (Set of 2)
Reliable nonstick pans for muffins, cupcakes, egg bites, and more — even heating, easy cleanup, and great value.
👉Get it on Amazon6. Stand Mixer (5–6 Quart)
Makes mixing doughs and batters effortless during holiday baking.
👉Grab it here on AmazonDisclosure:
As an Amazon Associate, I earn from qualifying purchases. This means if you click on one of the product links and make a purchase, I may receive a small commission at no extra cost to you. I only recommend products I personally use and love.
Expert Tips for Success
- Room Temperature Matters: Eggs and milk mix more evenly at room temperature, creating a better emulsion and a more uniform crumb.
- Don’t Over-Swirl: A few gentle passes with a knife create a beautiful marbled effect. Over-swirling will muddy the colors.
- Glaze a Cool Cake: Glazing a warm cake will cause the icing to melt and slide right off. Patience is key.
- Storage: Store the glazed cake, loosely covered at room temperature, for up to 3 days. For longer storage, freeze the unglazed cake for up to 2 months.
Frequently Asked Questions (FAQs)
Q: My cake stuck to the pan! What can I do?
A: If it’s stuck, let it cool upside down a bit longer—sometimes gravity helps. Gently loosen edges with a flexible silicone spatula. Patch any imperfections with extra glaze and candy. It will still taste amazing!
Q: Can I use mint extract instead of peppermint?
A: I do not recommend it. Mint extract is typically spearmint, which tastes like toothpaste when paired with chocolate. Pure peppermint extract is essential for the right flavor.
Q: Can I make this in a different pan?
A: Yes, but you’ll lose the Bundt shape. You can use a 9×13 inch pan or two 9-inch rounds. Adjust baking time (start checking at 25-30 minutes for rounds).
Q: How do I get the candy cane pieces to stick?
A: Sprinkle them onto the wet glaze immediately after drizzling. The glaze acts as glue.
Q: Can I make this ahead of time?
A: Absolutely. Bake and cool the cake completely. Wrap it tightly in plastic wrap (unglazed) and store at room temp for 1 day or freeze. Glaze and decorate the day you plan to serve it.
Conclusion: Your New Holiday Baking Tradition
This chocolate peppermint Bundt cake recipe is your guide to creating a dessert that’s as joyful to make as it is to share. By focusing on the key techniques—the foolproof pan preparation, the blooming of cocoa, the gentle swirl, and the patient cool—you’re guaranteed a stunning and delicious result. This cake proves that impressive desserts don’t have to be complicated.
You now have a reliable, festive masterpiece that’s perfect for gifting, sharing, or savoring as the centerpiece of your holiday table. It’s a recipe built for creating sweet memories.