The Lazy Person’s Guide to Legendary 3-Ingredient Anzac Biscuits
So, you want that iconic, chewy-crunchy, oat-y goodness of an Anzac biscuit, but the thought of measuring out golden syrup and tracking down desiccated coconut makes you want to lie down? Same. What if I told you that the soul of an Anzac biscuit—that toasty, caramelized, impossibly moreish flavor—is hiding in just three ingredients? No, really. Stop raising your eyebrows and grab a bowl. We’re about to break all the traditional rules in the best way possible.
Why This Recipe is Awesome
Let’s cut to the chase. This recipe is a culinary shortcut of legendary proportions. It’s:
- Idiot-Proof: I tested these while simultaneously explaining to my cat why he can’t eat the couch. They are incredibly forgiving.
- Blazingly Fast: We’re talking 15 minutes from “I have a craving” to “I am eating a warm biscuit.” It’s faster than ordering delivery.
- The Ultimate Pantry Raid: You almost certainly have these ingredients right now. No special trips to the store required.
- Your Secret Weapon: Serve these to a Kiwi or Aussie friend and watch their mind explode when you reveal the ingredient list. Your secret is safe with me.
Ingredients You’ll Need
Take a deep breath. Try not to be overwhelmed by this massive, complicated list.
- 2 cups Rolled Oats (the old-fashioned kind): This is your foundation. Don’t use instant oats or you’ll get a sad, mushy biscuit. We want texture!
- 1 can (395g) Sweetened Condensed Milk: This is the magic glue. It provides the sweetness, the chew, and that beautiful golden color. Do not use evaporated milk—it’s not the same thing!
- ½ cup (1 stick) Butter, melted: This brings the rich, toasty flavor and helps everything crisp up. Salted or unsalted works fine here.
Step-by-Step Instructions
If you can stir and scoop, you’ve got this.
- Preheat and Prep. Crank your oven to 350°F (180°C) and line a baking sheet with parchment paper. This is your one “fancy” step, and it’s just to save you from scrubbing.
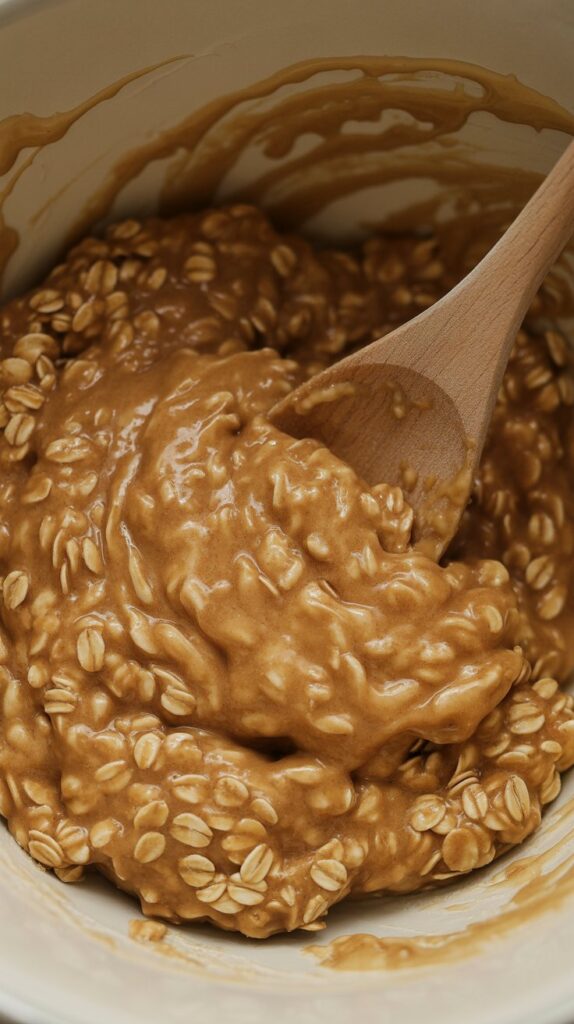
- Mix the “Dough.” In a medium bowl, combine the rolled oats and melted butter. Pour in the entire can of sweetened condensed milk. Stir everything together until it’s one gloriously sticky, oaty mess.
- Scoop and Shape. Drop heaped tablespoonfuls of the mixture onto your prepared baking sheet. Gently press them down with your fingers or the back of a spoon. Leave space between them—they will spread a little as they bake.
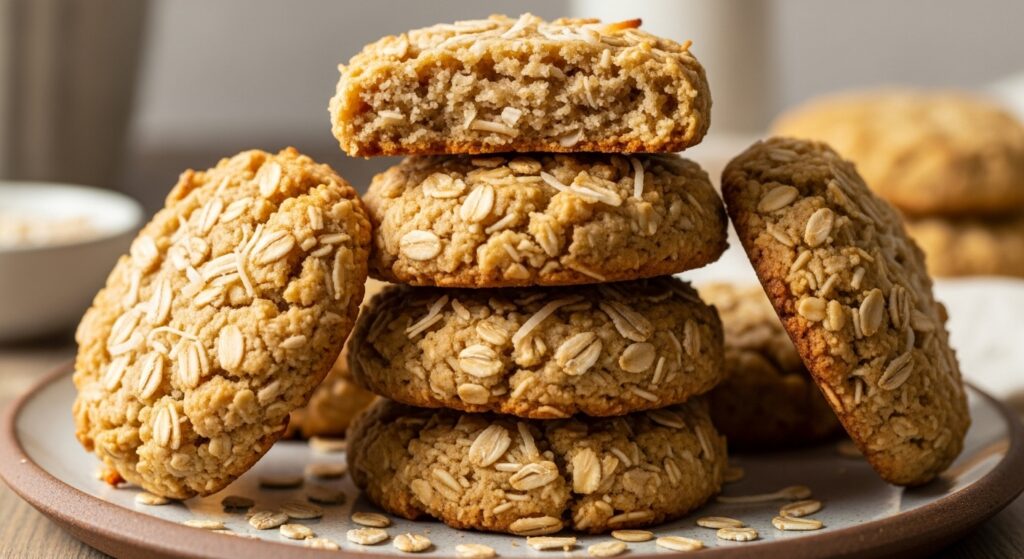
- Bake to Perfection. Pop them in the oven for 10-15 minutes. You’re looking for golden brown edges. They might look a bit soft in the middle, but that’s perfect! They firm up as they cool.
Common Mistakes to Avoid
Let’s learn from the (totally hypothetical) mistakes of others.
- Overbaking for Crunch: Want a crispy biscuit? I get it. But if you bake these until they’re firm in the middle, they’ll turn into jaw-breaking hockey pucks once they cool. Take them out when the edges are golden but the centers still look a little underdone.
- Using Instant Oats: This is the #1 reason for flat, sad biscuits. Instant oats absorb liquid differently and don’t hold their structure. Rolled oats are non-negotiable for that classic chewy texture.
- Skipping the Parchment Paper: These are sticky little devils. Without parchment paper, you’ll be chiseling your biscuits off the pan. Don’t be a hero.
- Not Letting Them Cool: I know, it’s torture. But if you try to move them off the tray straight from the oven, they’ll fall apart. Let them set on the tray for at least 10 minutes.
Alternatives & Substitutions
Feeling a little fancy? Or just out of an ingredient? Let’s play.
- Add Some Zest: Stir the zest of one lemon into the mix. It adds a incredible bright note that cuts through the sweetness beautifully.
- A Pinch of Salt: If you used unsalted butter, add a big pinch of flaky sea salt to the mix or sprinkle it on top before baking. Sweet and salty is always a win.
- The Coconut Lover’s Fix: Okay, fine. If you’re a coconut traditionalist, you can replace ½ cup of the oats with desiccated coconut. IMO, it’s not needed, but I won’t tell.
- Make it a Slice: Press the entire mixture into a lined square cake tin and bake for 20-25 minutes. Cut into bars while still warm. Easy peasy.
FAQ (Frequently Asked Questions)
- “Are these real Anzac biscuits?” Well, they’re not the traditional recipe sent to the troops, but they capture the spirit perfectly. They’re the easy-bake, flavor-packed version for modern life.
- “My biscuits are too soft/too hard!” This is all about bake time. 12 minutes gives you a chewy biscuit. 15 minutes gives you a crunchier one. Find your perfect golden-brown moment!
- “Can I use margarine instead of butter?” Technically, yes. But will it have that rich, toasty, buttery flavor? Absolutely not. Why would you do that to yourself?
- “Why didn’t they spread?” You probably packed the mixture down too firmly on the tray. A gentle press is all they need.
- “How do I store these?” In an airtight container at room temp. They’re best within a week, but let’s be real—they won’t last that long.
🔥 Recommended Baking & Kitchen Essentials
Here are a few of my favorite tools that make baking (and biscuit-making!) easier, faster, and way more fun.
1. BLACK+DECKER Crisp ’N Bake Air Fry Toaster Oven
Crisps, toasts, bakes, and air fries — all in one compact countertop oven. Perfect for quick biscuits, snacks, and weeknight cooking.
👉 Check it out on Amazon
2. CHEFMAN Digital Air Fryer + Rotisserie (XL 10L)
A true all-in-one appliance — air fry, roast, bake, dehydrate, and rotisserie family-size meals with ease.
👉 See today’s price on Amazon
3. 5-Piece Pastry & Biscuit Cutter Set
Everything you need for perfect biscuits: stainless-steel cutters, dough scraper, pastry blender, and a baking mat — beginner friendly and super durable.
👉 Grab it on Amazon
4. Nordic Ware Naturals Aluminum Half Sheet Pans (2-Pack)
Professional-quality sheet pans that brown beautifully, never warp, and last a lifetime — essential for any baking lover.
👉 View it on Amazon
5. Amazon Basics Nonstick 12-Cup Muffin Pans (Set of 2)
Reliable nonstick pans for muffins, cupcakes, egg bites, and more — even heating, easy cleanup, and great value.
👉 Get it on Amazon
6. Stand Mixer (5–6 Quart)
Makes mixing doughs and batters effortless during holiday baking.
👉 Grab it here on Amazon
Disclosure:
As an Amazon Associate, I earn from qualifying purchases. This means if you click on one of the product links and make a purchase, I may receive a small commission at no extra cost to you. I only recommend products I personally use and love.

Final Thoughts
And just like that, you’ve done it. You’ve harnessed the power of three simple ingredients to create a biscuit that’s packed with nostalgia and flavor. No fuss, no complicated steps, just a plate full of delicious, oaty goodness.
Now, go put the kettle on, grab a still-slightly-warm biscuit, and take a well-deserved bite. You’ve just mastered the art of lazy baking, and it tastes incredible. You’ve totally earned it. 🙂