So, you want to make cookies that look like you’re a pastry artist but are actually kinda hard to mess up?
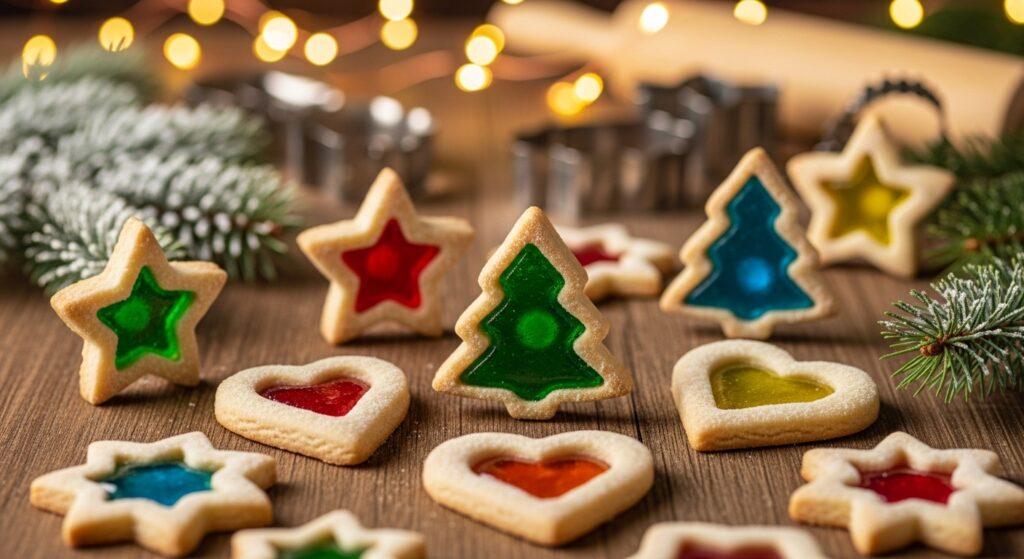
Perfect. You’ve found your recipe. Stained glass Christmas cookies are the ultimate holiday flex. They look intricate and delicate, like something from a fancy bakery window, but the process is basically just adult-approved Play-Doh with a sweet, crunchy surprise inside. They’re the perfect project for a cozy afternoon, especially if you have tiny helpers eager to get their hands dirty.
Why This Recipe is Awesome
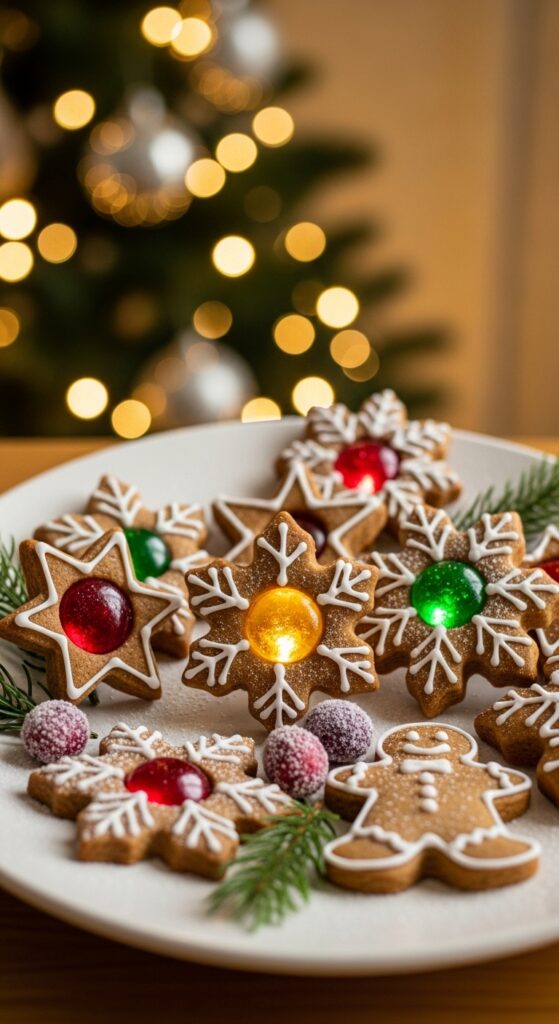
Let’s be real, these cookies are mostly for showing off. But in the best way possible! They’re stunning on a cookie platter, make incredible edible ornaments, and are a fantastic way to use up those random, lonely hard candies left in the bottom of the bowl. The process is fun, the result is magical, and people will genuinely be impressed. It’s a total win-win.
Ingredients You’ll Need
Gather your squad. This is a standard sugar cookie base with a brilliant, shiny twist.
- 1 cup (2 sticks) Unsalted Butter, softened: The foundation of all things good and buttery.
- 1 cup Granulated Sugar: For sweetness and that classic cookie texture.
- 1 large Egg: The binder that holds our dream together.
- 1 tsp Vanilla Extract: For that warm, cozy flavor.
- 3 cups All-Purpose Flour: The main structure.
- ½ tsp Baking Powder: For a little lift.
- ½ tsp Salt: To make all the flavors pop. Don’t skip it!
- A big bag of Hard Candies (Jolly Ranchers, Life Savers, etc.): This is the star of the show! Stick to one color per cookie for the best effect. Separate them by color before you start smashing.
Step-by-Step Instructions
- Make the Cookie Dough. In a large bowl, cream together the softened butter and sugar until it’s light and fluffy. Beat in the egg and vanilla extract. In a separate bowl, whisk together the flour, baking powder, and salt. Gradually add the dry ingredients to the wet ingredients, mixing until a smooth dough forms.
- Chill Out. Divide the dough in half, shape each into a disc, and wrap them in plastic wrap. Refrigerate for at least 1-2 hours. This step is non-negotiable unless you want puddle-shaped blobs instead of cookies.
- Smash Your Candy. While the dough chills, unwrap your hard candies and place each color in a separate zip-top bag. Crush them with a rolling pin until you have fine crumbs. Channel any holiday stress into this step. It’s very therapeutic.
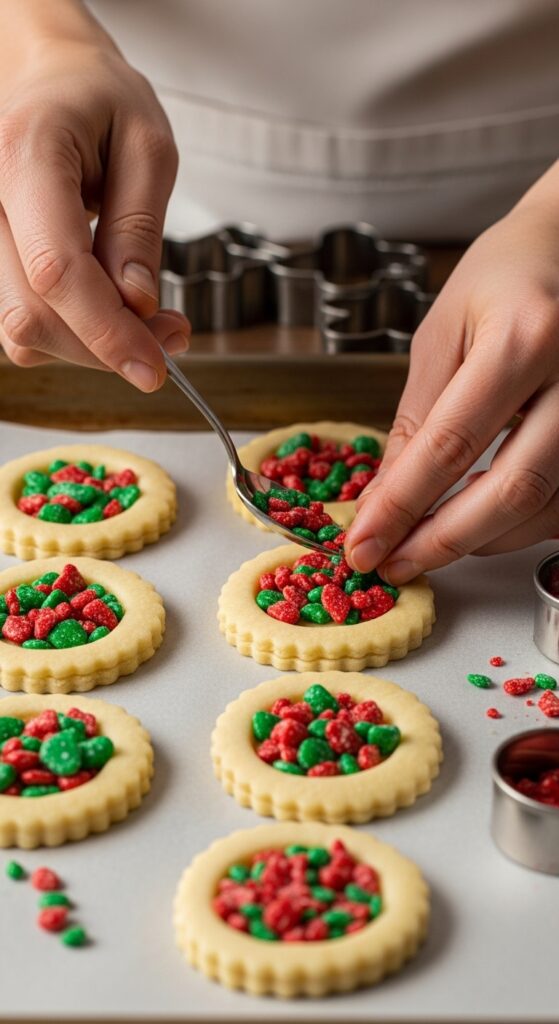
- Roll, Cut, and Create Windows. Preheat your oven to 350°F (175°C). Roll out one disc of dough on a floured surface to about ¼-inch thickness. Use cookie cutters to cut out your shapes. Now, the key step: use a smaller cutter (or a knife) to cut out a center section from each cookie. Transfer the whole cookies to a baking sheet lined with parchment paper.
- Fill the Windows. Carefully fill the center holes with your crushed candy. Don’t overfill them! You just want a thin, even layer. The candy will spread a lot as it melts.
- Bake to Shiny Perfection. Bake for 10-12 minutes, or until the edges of the cookies are just starting to turn golden brown. The candy centers will be completely molten. Let the cookies cool on the baking sheet for a full 15 minutes. The candy will harden into a beautiful, glossy pane as it cools.
Common Mistakes to Avoid
Learn from my disasters so yours are picture-perfect.
- Under-Chilling the Dough: Your dough will spread and your beautiful shapes will warp. The fridge is your best friend here. No arguments.
- Overfilling the Centers: A little crushed candy goes a long way. If you pile it too high, it will bubble over the edges and glue your cookie to the pan. A thin, even layer is the goal.
- Using Parchment Paper: I’m not suggesting it, I’m demanding it. You MUST use parchment paper. The melted candy will fuse permanently to a bare or greased baking sheet.
- Moving Too Soon: Let the cookies cool completely on the sheet. If you try to move them while the candy is still soft, you’ll have a sticky, broken mess.
Alternatives & Substitutions
Want to mix it up? Go for it.
- No Time to Chill? You can pop the cut-out cookies on the sheet pan into the freezer for 15 minutes instead. It’s a decent shortcut.
- Different Extract? Swap the vanilla for almond or lemon extract for a different flavor vibe. Almond is my personal fave.
- Gluten-Free? A 1:1 gluten-free flour blend works great in this recipe. The texture is nearly identical.
- Use a Mix? Honestly? A store-bought sugar cookie roll will work in a pinch. I won’t tell anyone.
FAQ (Frequently Asked Questions)
- Can I use chocolate or butterscotch chips instead? No, they don’t melt clear! You need hard candies for the authentic “stained glass” effect.
- Why did my candy turn bubbly and brown? You probably over-baked them. The candy melts quickly. As soon as the edges of the cookie are golden, they’re done.
- How do I store these? In a single layer in an airtight container at room temperature. They’re fragile, so be gentle! They’ll keep for about a week.
- Can I hang them on the tree? Absolutely! Once completely cool, use a toothpick to carefully make a small hole in the top of the cookie before baking. After baking and cooling, loop a ribbon through the hole.
- My candy didn’t spread smoothly. What happened? Your crushed pieces might have been too big. Smash them into a near-powder for the smoothest finish.
🎁 Recommended Holiday Kitchen Essentials
🍳 Here Are a Few of My Favorite Holiday Kitchen Essentials — Tools That Make Christmas Cooking Easier, Faster, and Way More Fun (From Baking Cookies to Preparing Cozy Casseroles and Festive Drinks!)
- Crock-Pot 8-Quart Programmable Slow Cooker
Perfect for big families or meal prepping — set it, forget it, and come home to tender, juicy meals every time.
👉 Check it out on Amazon - Christmas Cookie Cutter Set
Bake adorable festive cookies that everyone will love.
👉 Get yours now on Amazon - Stand Mixer (5–6 Quart)
Makes mixing doughs and batters effortless during holiday baking.
👉 Grab it here on Amazon - Glass Punch Bowl Set
Serve Christmas drinks and punches beautifully.
👉 Shop now on Amazon - Ceramic Baking Dish Set
Ideal for creamy casseroles and sweet desserts — oven to table in style.
👉 View it on Amazon
Disclosure: As an Amazon Associate, I may earn a small commission from qualifying purchases at no extra cost to you. I only recommend products I personally love and use for my own recipes.
Final Thoughts
And there you have it. You’ve just created edible holiday magic that’s as fun to make as it is to eat. These cookies are proof that you don’t need professional training to make something breathtakingly beautiful.
Now, put on some holiday tunes, pour yourself a glass of milk, and admire your handiwork. You’ve absolutely earned it. Happy baking